Chat 16

We could do with Saint George getting on his horse today and slaying the Covid 19 dragon.
Stay safe, stay well, stay in.
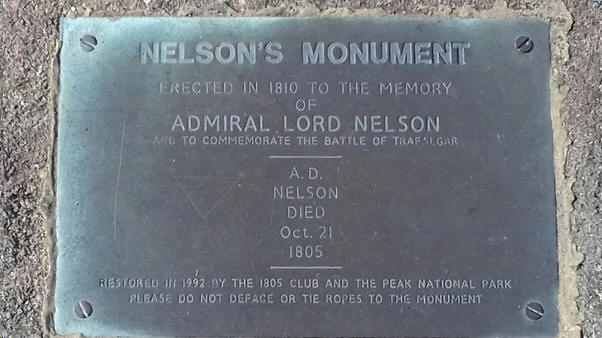
Mick Leach asked :- Can anyone recognise this Derbyshire landmark? The answer :- :- Nelson's Monument on Birchen Edge near Baslow Derbyshire. Correct answers from Mick Dughan and Don Eades.

The
three rocks known as the three ships in the final picture have the
names Victory, Royal Sovereign and Defiance engraved on them. Maybe
one day some of the orienteers amongst us might go and have a look.
All the Best Mick


The three rocks with Victory, Royal Sovereign and Defiance
engraved on them. The monument is in the background on the left.
 Remember
this quiz picture of a very well know member of the section
and the club? Pat Robotham, Walter Partington and Mick Dughan
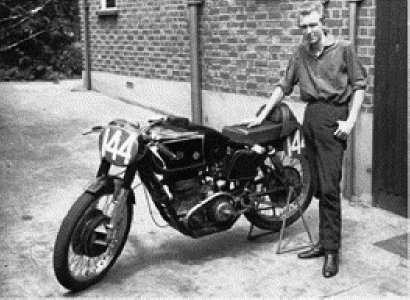
guessed it. It is Pat Davy with his first race bike,
an AJS 7R. Remember
this quiz picture of a very well know member of the section
and the club? Pat Robotham, Walter Partington and Mick Dughan
guessed it. It is Pat Davy with his first race bike,
an AJS 7R. |
A different view on "recycling from John Grew. (Eddy.)
Proper Recycling
Recycling is the “in thing” these days as local
authorities, quite rightly, encourages us all to avoid the landfill
scenario for our waste.
Was it circa 30 years ago that some councils
started to offer recycling facilities at the local “dump”? Coalville
and District Council was no exception and recycling skips started to
appear at their tip at Lount, near Ashby-de-la-Zouch.
These days the facilities are well organised
with clearly defined receptacles and an army of workers presiding
over your every move to ensure nothing is cross contaminated! “Elf
and Safety” rules must be obeyed or else.
It wasn’t like this in the good old days up at
Lount. One weathered chap ensconced in his sentry box with
obligatory ‘British Standard’ flat cap was in charge of the whole
affair. He only appeared to drink tea, and if approached, would
point in the general direction of a selection of battered skips that
might, or might not, swallow up the correct material. The scrap
metal skip was the largest and had a drop front akin to a roll on
roll off ferry door.
My wife suggested that a trip to the tip with
some garden waste was an ulterior motive for me to have a rummage
around the skips. She joked that I always came back with more than I
went with! My response was that it was “proper recycling”.
 It was on one of these visits to the tip that I
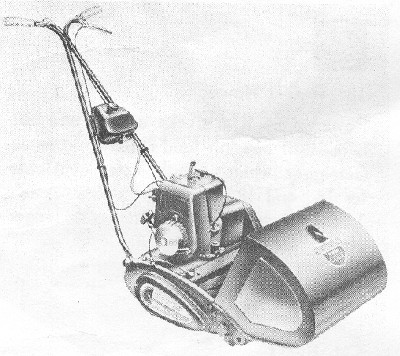
sneaked right into the metal skip to have a good look. There was the
usual selection of old prams and bed frames, but what caught my eye
was a Suffolk Colt petrol driven lawn mower.
I was familiar with this type of lawn mower. One of my many ‘school days’ money earning jobs was mowing the lawns on Ashby’s parish church graveyard with such a machine. Sam, the verger, also overhauled the mowers in the winter months and I learned much about things mechanical as I looked over his shoulder. Sam was a great teacher and was one of the influences that sparked my interest in engineering at an early age.
One of the typical breakdowns on the mowers was
the recoil pull rope mechanism. The rope would break and require the
mechanism to be dismantled. This was a simple job for an engineer
‘in the know’, but presented a conundrum to an unsuspecting amateur
as springs etc. flew out of the device in all directions as the
retaining screws were removed!
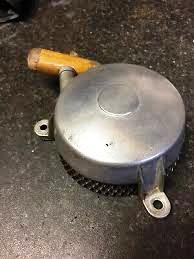
On close inspection I could see that the recoil
starter rope was broken, and typically, the previous owner’s efforts
were unsuccessful as all the bits had been rammed back together. I
presume the owner immediately went out to purchase one of the new
“gutless”, but convenient electric mowers. The old Colt was duly
dumped at the tip.
I was really excited when I got home, but the
response from Julie was par for the course. “You’re like a big kid
with a new toy; more rubbish taking up space”.
Undaunted, I set to and refurbished the mower.
A de-coke and valve grind was rewarded with good compression and the
recoil mechanism was a simple task for the initiated. I treated it
to a repaint of Woolworth’s finest “pound a pot” red and green and
re sharpened and ‘set’ the blades, but I was still short of a grass
box.
An old 5 gallon “Gulf straight 50” oil can was
cut and shut with the aid of ‘pop’ rivets and hey presto; an instant
grass box! Pity I never took a photograph of the ensemble.
We used the mower for, may be, 10 years and it
worked perfectly. Total outlay was circa £2. However, times had
moved on and we started to suffer from the dreaded 2 car situation
as our son became of age. The lawn was dug up to be replaced with
the ubiquitous block paving and the faithful Colt became redundant.
“I’ll take it to the tip on my next visit love. It doesn’t owe us
anything and it is status quo with 10 years earlier”. “Yes, dispose
of it, but don’t bring anything else back, I know you”.
Around about this time every household received
a free weekly advertising paper. Personal adverts were free. Ours
was The Burton Trader. “Why don’t you stick an advert in The Trader
in stead of taking it to the tip; you never know”. I was sceptical,
but suggested a price of £5, especially in view of the tin grass
box. She added, “I’ll put the ad in and pitch it at £25. I bet we
won’t get any telephone calls, but we have lost nothing really if it
goes to the tip again”.
A few days later The Trader dropped through the
letter box, but I wasn’t expecting any calls. Then the phone rang.
“Can I come round straight away”?
The man duly appeared shortly afterwards. “Does it start OK?”
A quick tickle and half choke and the Colt burst into life first
pull as it always did. “Here’s £25; can you give me a lift into the
boot?” We had lots of calls that evening.
So here we have an example of “Proper
Recycling”. Perhaps this short story isn’t alien to our clan because
we tinker with old motorbikes. Is it the lack of knowledge of the
general public to make do and mend? Is it lack time? Is it the lack
of inclination? Or have we become a throwaway society? There is no
moral standing on my part, just good fun, and satisfaction!
John Grew
The latest creation from Tony Harris, a "V" twin Ariel. The video below was the first start and it started first kick. I'll ask Tony to give us a few more details for a later chat.
NHV Ariel
Some photographs of the bike with just a few minor bits to fit. Tony has had a short test ride and reports that it steers well and the engine pulls strongly from low down.
Matchless G11 600cc Twin Lucas E3L Dynamo 12v Conversion Part 3
|
|
| 5a |
|
|
| 5b |
|
|
| 5c |
|
|
| 5d |
First I went to fit the small bearing onto the commutator end of the armature, but whilst comparing the new armature with the old I noticed a brass distance piece in situ located on the old armature. I tried to remove it but it was solid. I decided it was quicker to make a copy. With the new distance piece slipped on the armature I pressed the small bearing onto the shaft. I then fitted and tightened the end screw. See pic 5b.
Note the distance piece securely and effectively centralises the bearing outer race in the housing.
Next I positioned the bearing housing at the drive end of the
armature and then pressed the bearing onto the armature shaft using
a tube and copper hammer. I then pressed the spacer on which the
mechanical lip seal bears, again making use of the tube and hammer.
The bearing housing was then pulled on to the bearing outer race.
See pic 5c.
Then the mechanical lip seal was lightly lubricated with grease and pushed into the seal housing. See pic 5c. After greasing the spacer the seal housing assembly was then slipped onto the armature and then fastened to the bearing housing using the 3 small screws. The woodruff key was then fitted to the single keyway. This was followed by fitting the drive pinion. Whilst fitting the bearing, the spacer and pinion to the armature care must be taken to support the bearing housing to prevent it becoming in contact with the armature windings potentially causing damage to the insulated wire. For each item tapped onto the shaft you know it is securely located by a clear solid sound. With the drive pinion in position the retaining bolt and tab washer was fitted to the end of the armature. After tightening the fastener was locked by bending up the tab firmly against a hexagon flat. See pic 5d.
The assembled armature was then offered into the dynamo body. The drive end bearing housing was located in the body and the commutator bearing housing was fitted in place locating on the dynamo body. Next the two longitudinal fasteners were fitted and both gradually tightened effectively clamping the whole assembly. The insulated brush carrier was fitted at the commutator end, followed by installing the commutator brushes. After consulting my pre dismantling photograph and reference books I made the wire connections. After I was satisfied the electrical connections were correct I “flashed” the dynamo for positive earth. I thought I had a cork gasket which seals the back of the engine timing case when the dynamo is fitted but after a quick search I found the “spare” gasket only to realise it had been previously used. So fitting the dynamo to the engine and testing it had to be postponed until an order placed with The Matchless & AJS Club Spares Scheme was delivered. I then attempted to drive the dynamo using an electric drill and a section of old inner tube bearing onto the pinion gear. The armature started to rotate but I could not keep the belt in position. Having gave up the attempt to drive the dynamo on the bench. I connected the dynamo to a 12 volt battery and the dynamo armature rotated freely and smoothly. Thankfully the armature rotated anti-clockwise as designed.
Part 4 to follow. John Renwick
Two quiz pictures in this Chat. The first is a piston from Malcolm Bridges. We think this one will be quite difficult so I'll leave it on for a day or two with a new clue each day.
The second is from my brother John who, with Julie is still on a campsite in Spain. A different type of puzzle.
What is this piston from? Answers by email to: edgrew@virginmedia.com

Question:- What is the link in these 4 pictures? Answers by by email to: edgrew@virginmedia.com


.jpg)
I'm short of copy. If you have anything please email it to me for inclusion in future chats. Eddy
